

Essentials for Baby's Sleep is a Squarespace website designed by Twenty07. This website is a research based forum for the research of Sudden Infant Death Syndrome (S.I.D.S). The website includes a video presentation and research and data gathering component for educating parents.

Dr Rosina
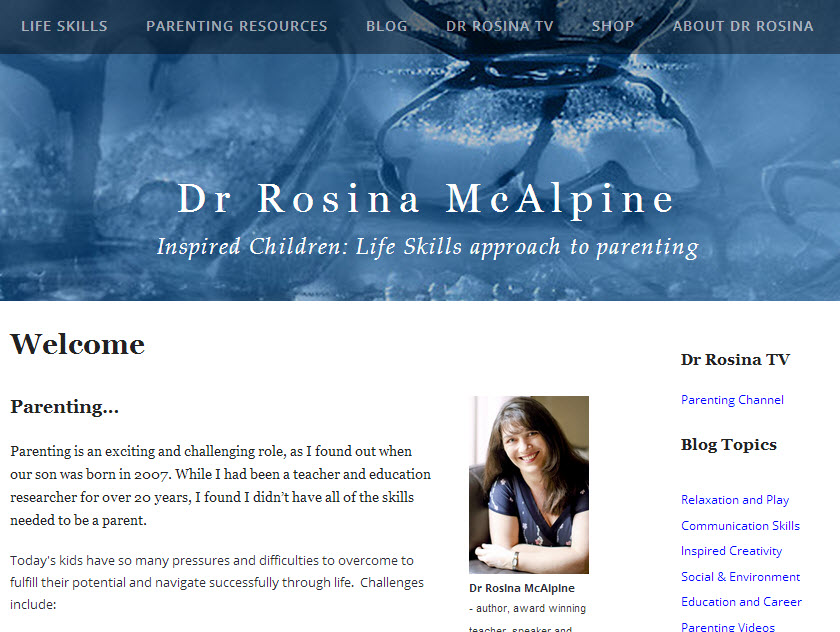
The Dr Rosina website by Twenty is designed in Squarespace. This is a large website incorporating Social Media, Video, Blog, E Commerce and large amounts of text structure in a way that is accessible to parents.
Dr Rosina is a leading expert in the parenting arena and her website allows her to communicate her research based, life skills approach to parenting and offer valuable positive advice to parents.
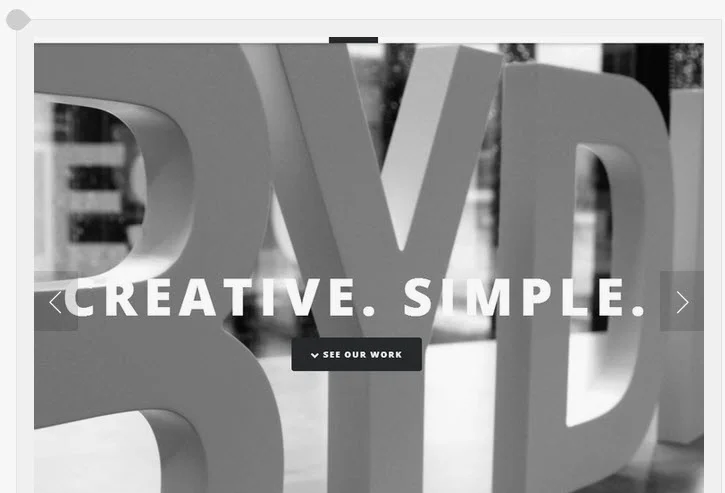
The Mighty Marketers
The Mighty Marketers website by Twenty07 was designed using Squarespace. Website presents a strong visual impact and incorporates Social Media integration, blog and Instagram feed.
The Mighty Marketers can leverage Social Media marketing to promote your business.

Editing a photo gallery in Squarespace
Galleries are used to add a collection of images which can be used throughout your website. To edit a Gallery first log in and select the relevant gallery page.
Double click on the Gallery image to open the Editing block
The box below should appear.

Where the red circle is click on this to open the upload section which should bring up your desktop/ Google Drive/ Dropbox etc where the applicable image is located. Double click on the image or select multiple images (you could also drag and drop them here). Once done the new image icon will appear
Note: When uploading images it is best to keep or crop them to similar sizes to ensure that they appear correctly in the gallery

Within the Edit block there are other options.
You can move around the order of the images simply by clicking on, holding and moving image.

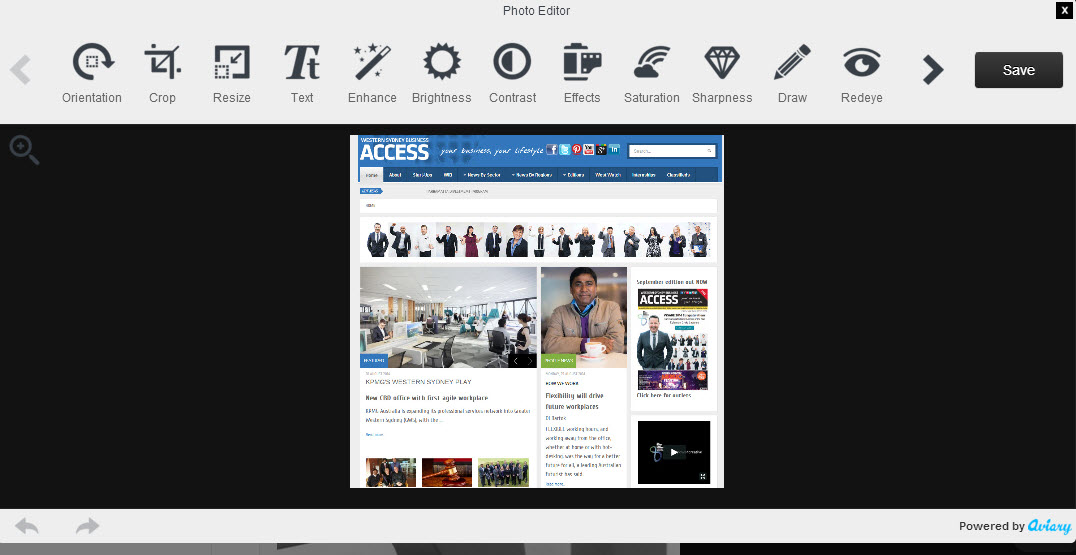
As you hover your curser over an image you will see some icons come up. The Garbage Bin is for deleting that image. The Cog brings up a pop up box to enter title and description and also allows you to set a Click through URL (where the user is taken if they click on the image). The Crayon (image below) brings up an Edit Box that allows you to re-size or crop the image, do colour corrections and other image alterations. you can also see a little white circle in the middle of the image. If you click on and move this circle around the image it will change the focus or centre of the image for display purposes.
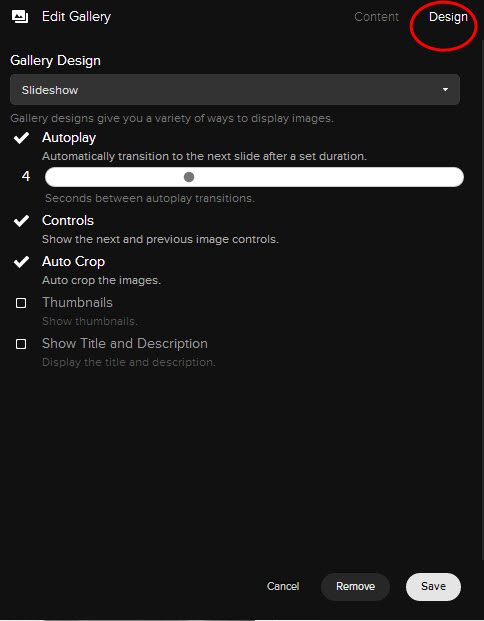
The Design Tab brings up features which determine how the Gallery is presented on your webpage.
These can vary from Template to template but selections usually include a
- Style such as Slideshow, or Grid. Autoplay and timing,
- Whether the controls for back and forward are visible
- Should the gallery Autocrop or show images as different sizes
- Thumbnails with size and padding (gap between thumbnails)
- Show title and description (entered via the Cog)
Save everything and you are done.
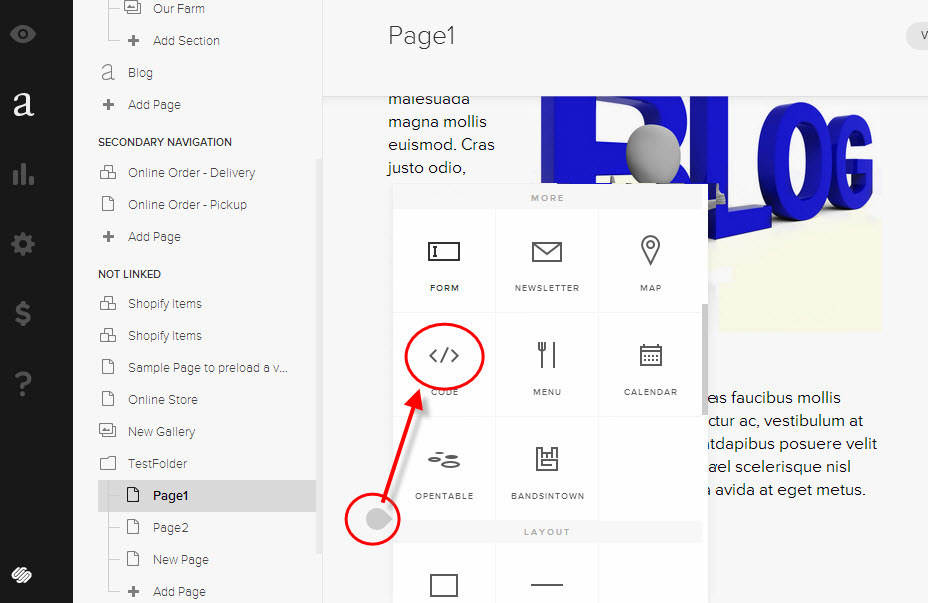
How to enter a Code block in Squarespace
Entering a code block in Squarespace is similar to any other Block content.
First enter your admin section and select the page you want to enter the code block onto. Select the black dot (circled in red) that brings up the content block and then scroll down to the Code </> Block and select.
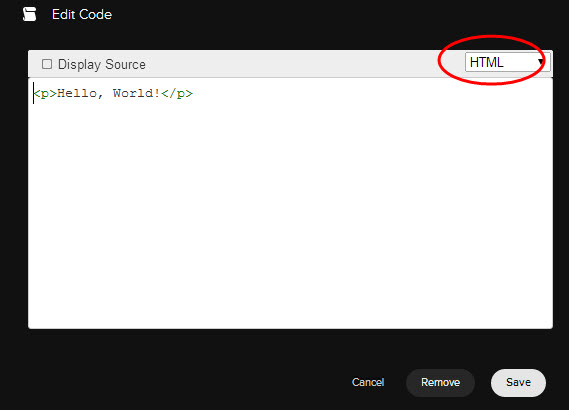
The Code box will then appear on your page. Determine whether you are entering HTML or Java and select the relevant one.
Copy your code to your clipboard. Then highlight the Hello World section (to overwrite) or you can delete first. You will then need to paste you code in Note: Right click of mouse may not work. You will need to CTRL V (CMD V on MAC) to enter code, then save.
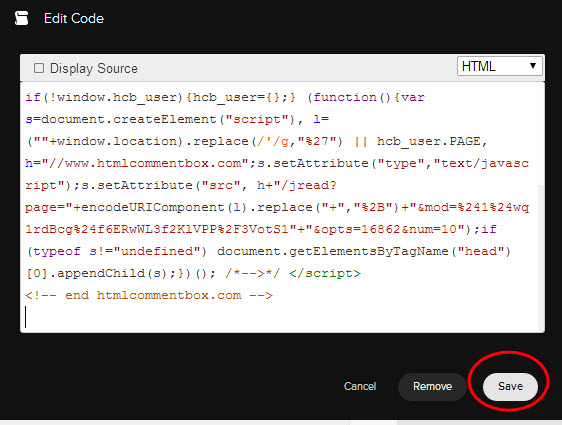
Your code should look something like the below.

To view click on View Page/Blog or visit the relevant page on your website.
TimeFinder
The TimeFinder website is the latest design by Twenty07 using Squarespace. The website incorporates Social Media and News Letter sign in form and details and promotes the TimeFinder book and corporate services.
TimeFinder helps organisations and people manage their time and productivity.

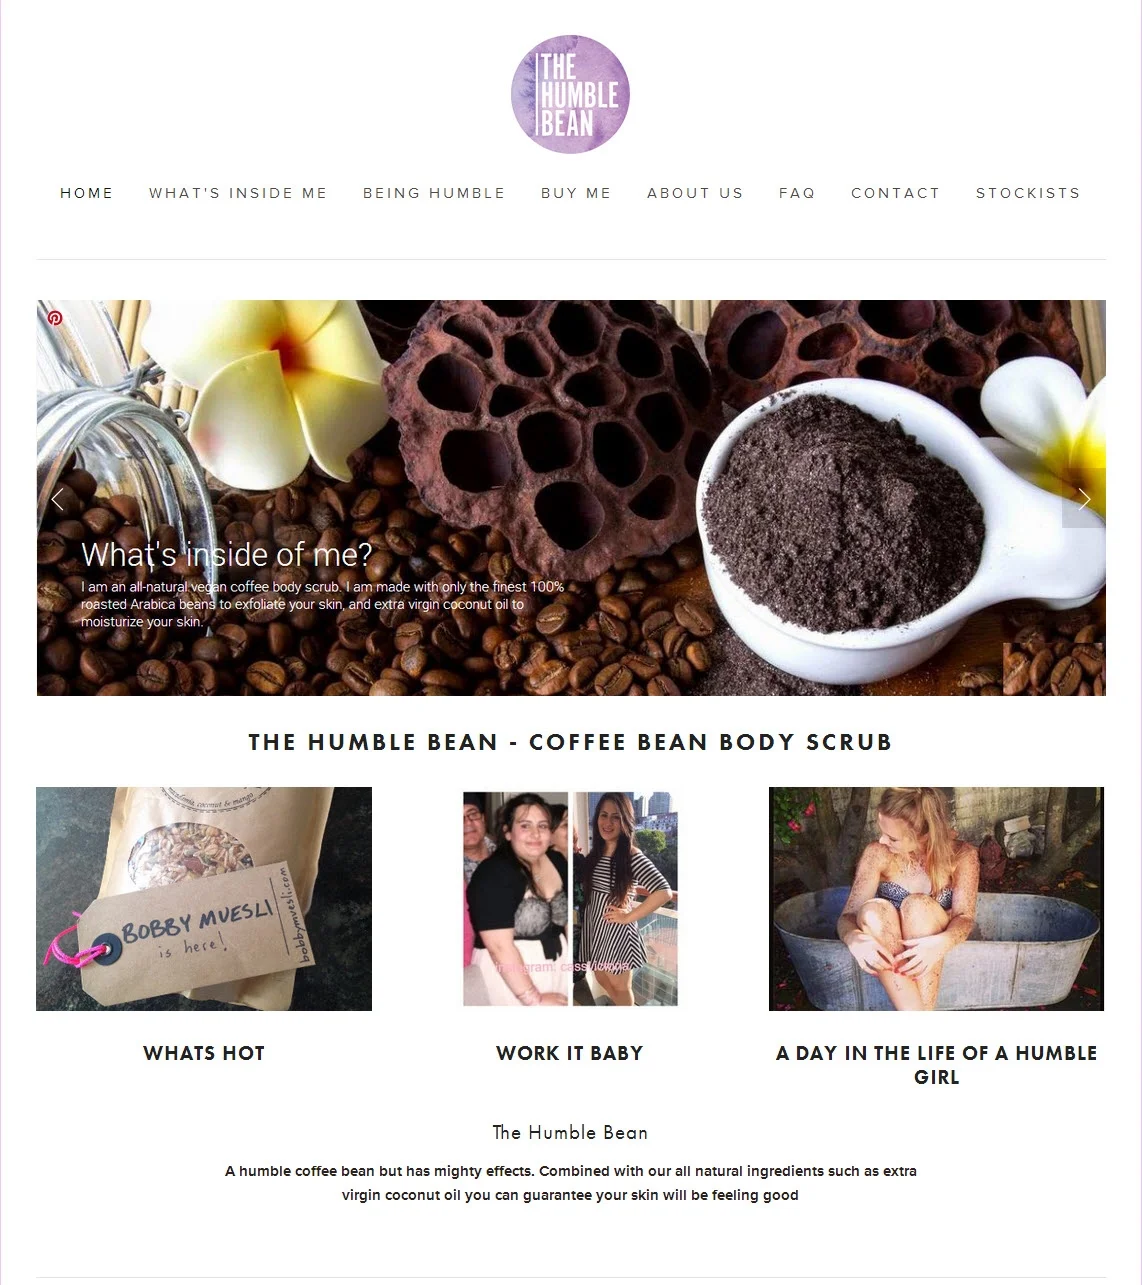
The Humble Bean
Latest Squarespace website by Twenty07 completed for The Humble Bean.
The website includes social media with Instagram and Facebook feeds, a News Letter sign in and E Commerce integrating Ecwid and Paypal.
The Humble Bean offers a unique Coffee Body and Exfoliating scrub.
Entering Video Blocks in Squarespace
Entering a Video Block is similar to entering an Image Block. First Login and select the desired page in your Navigation Menu. You cannot upload video directly in Squarespace, you must do via a third party provider such as Youtube or Vimeo. Select the desired Video and in this case using Youtube click on Share then copy the URL link that comes up.
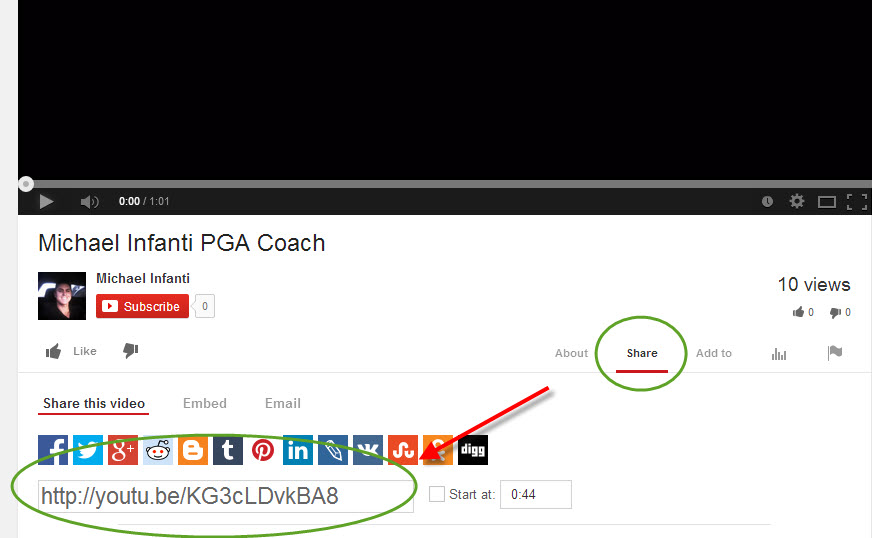
Click on the Black dot to bring up the content block

Click on the Video link

In the Pop Up enter the URL you copied from Youtube. The image that appears on your website will be the same as that of the image in Youtube. If you want to replace it use Custom Overlay and enter a new image. You can also decide to put a caption or not. The description that comes up will be the one from Youtube, you can change for SEO purposes. Click Save.

You can now manipulate the image size and position the same as an image as per this posting
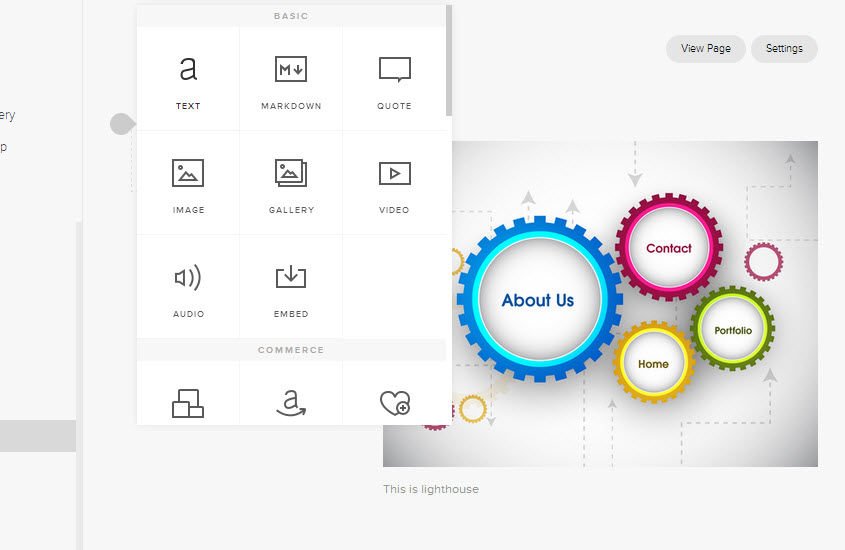
Entering Imaging blocks in Squarespace
To enter a new image block first Login and select the page and area you would like the image block to appear. When you move your cursor around you will see these little black dots appear (as highlighted in green).

Click one of these dots and a Content Block will appear. This block contains lots of options such as a Text, Quote or for this example click on Image
Click on the arrow in the white box and search your computer for the desired image then press save.
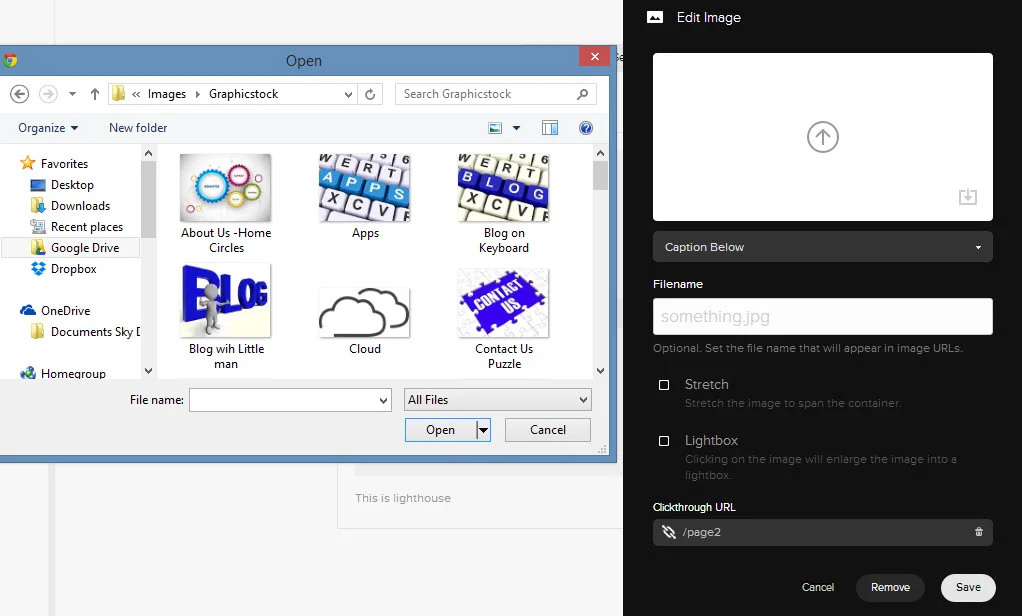
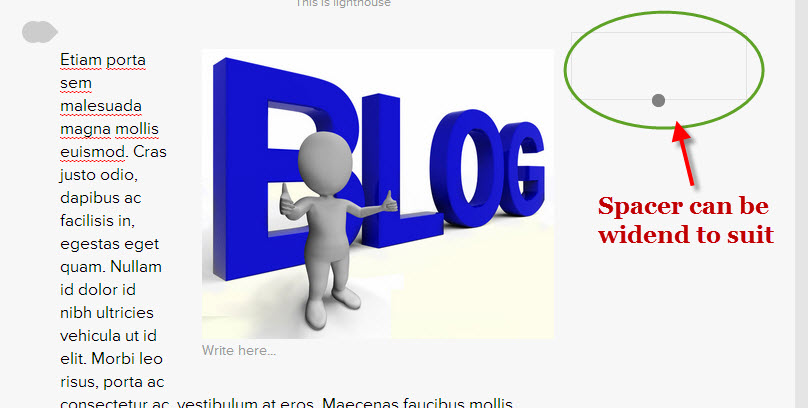
Details on the functions of Editing the image, Stretch and clickthrough URL can be found . If you would like to move the image Click and Hold on the image and then drag to where you want it to appear. You can put it inside a text box (text will wraparound) or outside a text block and the text will form a column next to image. See the 2 images below.

You can also use the Spacer function in the Content block (click on black dot to call up Content Block), click on Spacer and then you can move it next to the image, you can expand or shorten and image will enlarge or get smaller. You can put a spacer either side of the image to centre the image if desired.
Experiment with the Content Block to see the available functions, use a test page and put it in your Not Linked section in your Navigation menu.
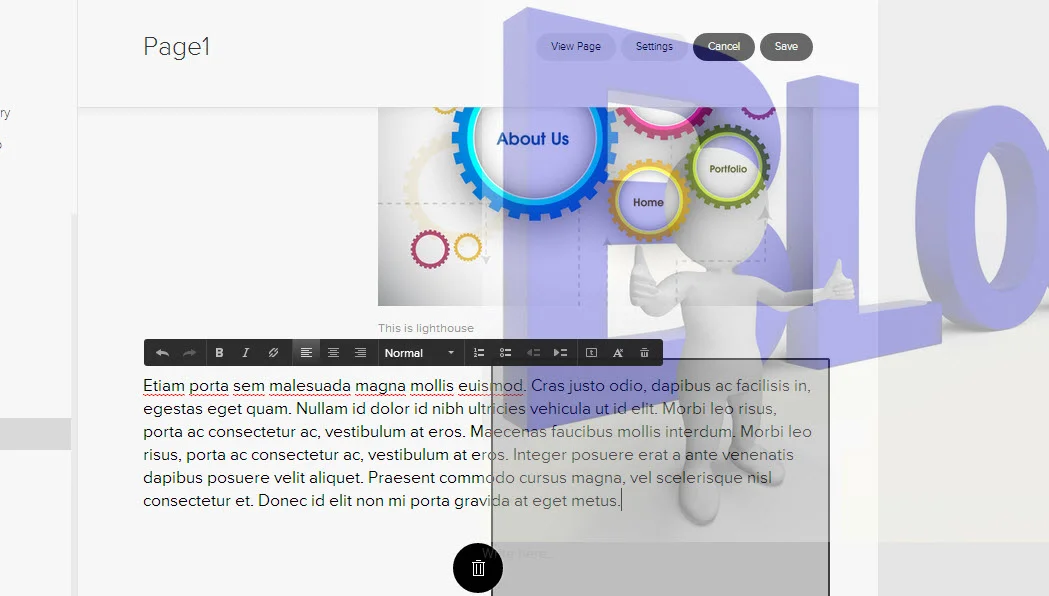
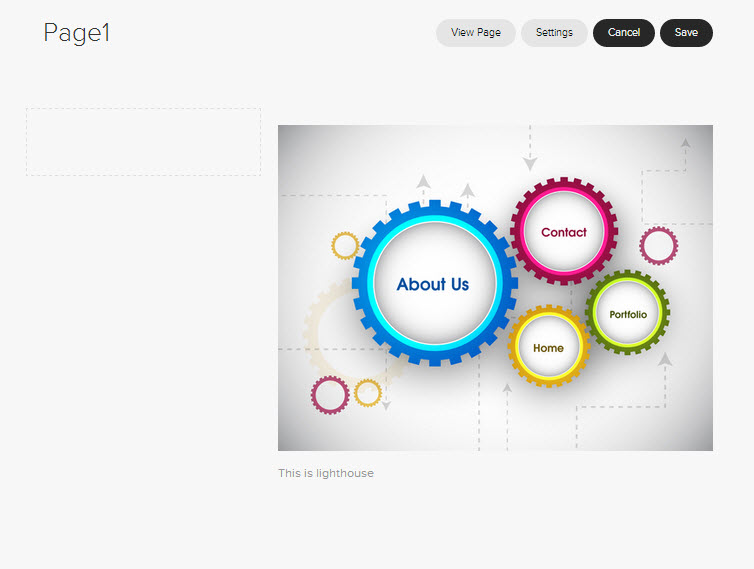
Editing images using the image block in Squarespace
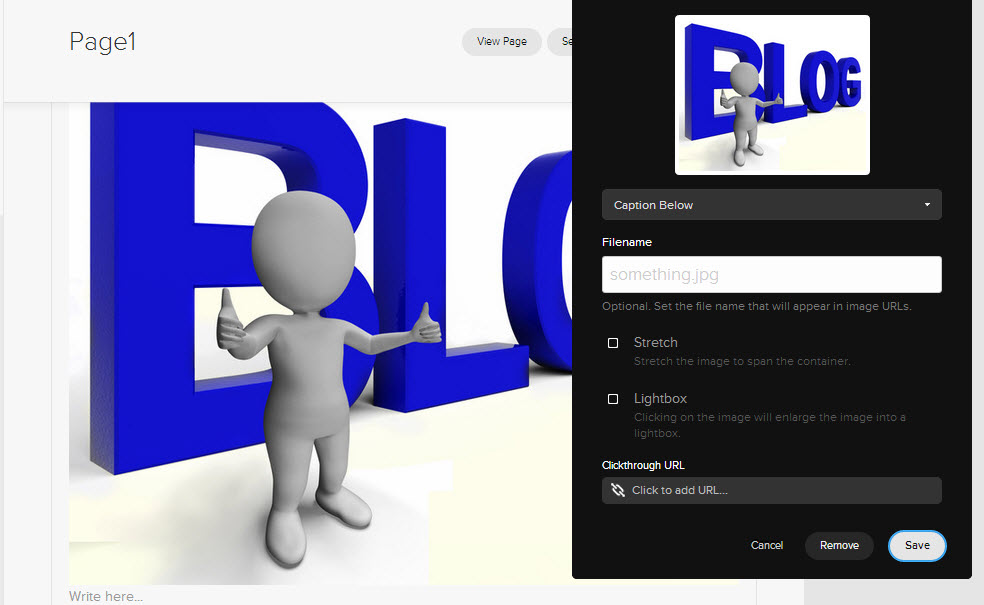
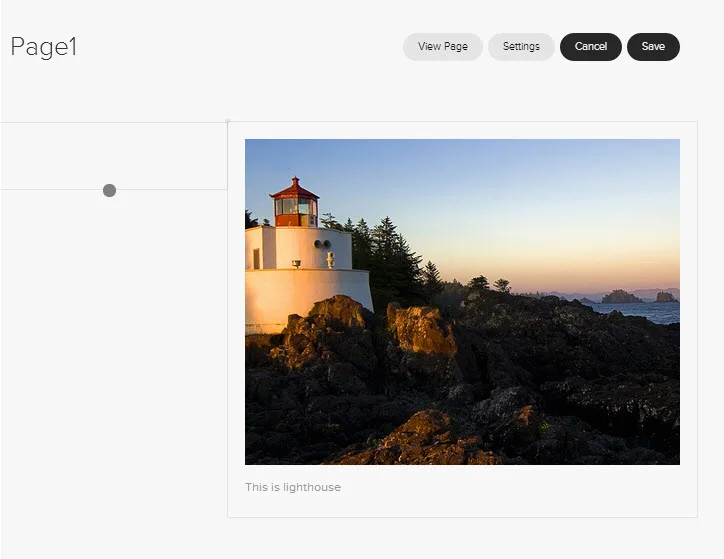
To edit or change an image in an Existing image block on your Squarespace website please first Login to your Squarespace account, select the page and then double click on the image you would like to edit..
In this example we will be changing this lighthouse image.
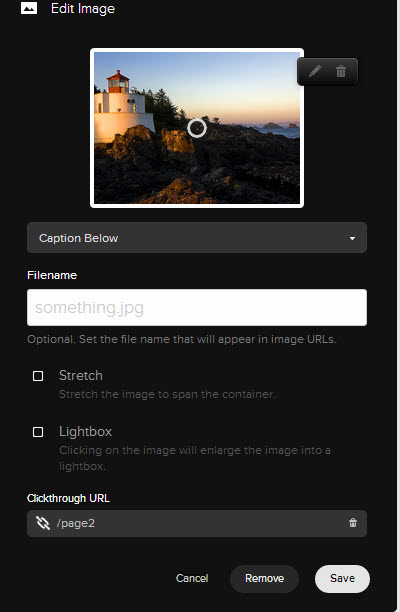
The Edit box appears. Note the circle in the middle of the image. That can be moved around to change the focus of the image. If the image needs to be re-sized such as on a mobile device it will maintain the focused area and drop of the areas around it.
To change the image click on the Garbage Bin icon and the image will be removed.
Once the old image has been removed click on the Arrow and then locate the new image you want to use on your computer, when located double click on the image to upload.

Your new image will now upload. You can use the circle to re-focus. You can also chose to add a Caption Below or Overlay (On top of Image) or Hover Overlay or No Caption. For SEO purposes it is best to add a file name which relates to the image and your business. If you select Stretch it will stretch the image to fit the size of container you have placed it in. Lightbox will enlarge the image in a pop up when someone clicks on it. The clickthrough URL will take someone to either a page on your website or external page (you can chose) upon someone clicking on the image.

If you click on the Crayon (next to the Garbage Bin icon) you can edit the image. Functions such as cropping, adding text etc. Click the cross to exit or save if changes made.

Click save and you new image should appear in your webpage.
Streamline your business processes
Business today involves so many tasks to keep your systems up to date to allow you to manage your business effectively. Large organisations have the resources to implement linked systems across all areas but at a cost that would be prohibitive to small business or individuals.
What difference would it make to your business if you could have tasks performed automatically

A Twenty07 designed website can integrate hundreds of apps and programs using simple, event-based automation to avoid the repetitive, time consuming tasks:
- An event happens in App 1
- Your task is performed in App 2
How much more efficient could your business be, delivering lower costs and increased customer satisfaction.
Upgrading to a Twenty07 designed website will deliver not only a beautiful functional website but the opportunity to automate many repetitive tasks, allowing you to concentrate on your business which can, over time, offset the cost of the investment made to upgrade.
If you feel that your business could benefit from this please contact Twenty07 to discuss you needs.

Twenty07 can design you the website you have always wanted.
We can you get you online fast or give your existing website an update. Using Squarespace we can setup your Website, add a Blog page and link your Social Media (Twitter and Facebook) anything else you may need. Our Services include:

- Website Design
- Blog setup with posting to Facebook, LinkedIn and others
- APP Project Management
- E Commerce
- Video Editing
Everything is done online, you can see the progress and approve the "template" prior to proceeding. Just supply us with the words and pictures you want to use for each page, and we will build your website, link your Facebook and Twitter, setup a Blog page if required and once complete train you on how to use everything.
But don't worry you wont be left on your own, we also provide training videos to help you along and if there is something you need help with just let us know and we can quote.
Are the any catches? We don't think so but there are some conditions, we only use Squarespace and if you already have a website you will need to setup a Squarespace account (or we can do for you), pricing is very reasonable for this full featured platform. Your domain name will need to be forwarded and we can provide help with this.
Twenty07 is a Squarespace Design Specialist
Twenty07 is excited to announce that it is now a registered Squarespace Design Specialist
We have worked hard to develop our skills with Squarespace and truly believe that the Squarespace platform and content management system provides the best of both worlds. It allows us to create beautiful, functional websites for our clients whilst allowing them to manage and update on a daily basis.

Connecting your Social Media in Squarespace

Connecting your social media in Squarespace could not be easier.
Step 1
Simply login to your Squarespace account and in the main menu on the left select the Cog icon.
Step 2
Select the Connected Accounts

Step 3
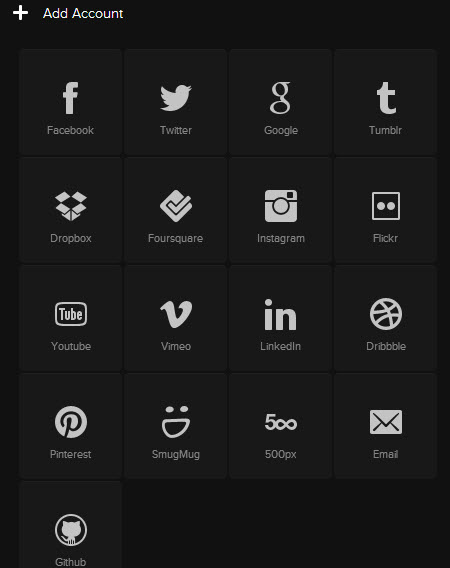
Select Add Account button and in the pop up that appears select the Social Media account you want to add. You will then be asked for the Username and password for the relevant account, enter those and follow any additional instructions and you are done. To add another account simply select Add Account again from the Connected Account section.
Step 4
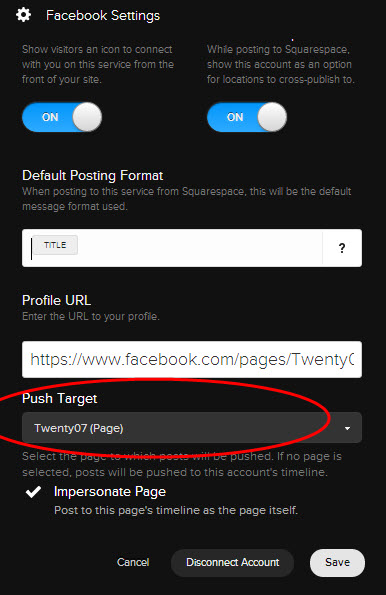
Often you may be the administrator of several different pages within your social media account. In Facebook for example click on the Facebook Connected Account you just setup and the following box will appear. Click on the Push Target and a list of each of the pages you manage will come up. Select the one that is applicable. If you also select impersonate page then when you post from your Blog to your Facebook it will post as that page.
Make your website and Blog posts come alive

Although content should always be your main focus when creating a web page or blog, it is important that your page also be visually appealing to attract a readers attention.
Using your own images is a great way to personalise your website but this is not always possible. Images can drive home a point or clarify a message, or even show the funny side of your message to keep the reader engaged.
Often you only have a few seconds to attract a reader and the use of a well placed image can be a great way to do this. There are many stock images and graphics sites available and you should when possible, and of course affordable, use these as I do.
Graphicstock have recently introduced an offer which I have taken up and thought I would share. Unlimited downloads from their catalogue for just $99 a year. So if you have a need for images I would check this offer out.

Website Health Check

Your website is one of the most important parts of your business, it should be working for you 24/7. How can you ensure that it is working effectively. Whilst the visual appeal of a website is desirable, without the proper design, structure and content your website may receive little traffic. Reasons for this may differ from the incorrect title structure and url definitions making it hard for Search Engines to read. The content and keywords may not be working effectively to maximise traffic, spelling, social media and linking may not be up to scratch. You may be spending money one one part of your website when investment might be better made elsewhere such as content or structure.
